Sunday, December 02, 2007

Cooking Laksa

I wonder who created laksa?

Maybe the origins was something like mole, where someone just used whatever ingredients that they had at hand and surprise, something beautiful was created. I don’t know. And how did all the different permutations come about?

Laksa, in this case laksa lemak, is a great dish. It is rich and comforting for the soul and it is a magic carpet ride of hot, spicy, fragrant and creamy sensations. For some reason I’ve never thought about making laksa from scratch. It does seem like quite a tedious task and since I work close to a pretty good laksa stall, it really doesn’t make sense. But since a Singaporean friend who has sense migrated was visiting for lunch I thought it was a perfect opportunity to try my hand at this.

You could make laksa for one, but if you are going to use all that elbow grease to pound all your ingredients rather than throwing it in a food processor (as I did, my excuse was that I woke up late and my guest were arriving so I couldn’t let them starve), you might as well get some people to help to make tonnes of it and they can enjoy the fruits of their labour at the same time. Once you get that pounding out of the way, everything else is rather simple. All you need to do is to fry the paste, add liquids and simmer.


Laksa

100 g cooking oil
150 g dried shrimp, soaked till soft and drain
400 ml coconut milk
1.5 litres chicken stock
Sugar to taste
Salt to taste
20 g tofu puffs, cut into strips or cubes
400 g thick rice noodles, blanched
Laksa leaves, washed and chopped

Laksa Paste
1 stalk lemon grass, white portion only sliced
100 g blue ginger/galangal, peeled and sliced
20 g candlenuts, roughly chopped
200 g shallots, peeled and roughly chopped
15 g chilli paste
20 g belachan
1 Tbsp ground coriander seeds
1 Tbsp ground turmeric

Condiments
16 prawns, shelled and boiled
30 g bean sprouts, blanched
Hard boiled eggs, halved

Method:

1. Prepare laksa paste. Grind all ingredients except turmeric and coriander seeds in a blender until a fine paste then add turmeric and ground coriander seeds.

2. Heat oil in a large heavy based pot. Fry laksa paste for about 5 minutes, add dried shrimp and fry for another 3 minutes. Add coconut milk and stock. Bring to a boil then simmer for 30 minutes. Season with salt and sugar to taste.

3. Strain stock and reserve dried shrimp. Grind dried shrimp in a food processor and stir into the stock for a thicker consistency. Add tofu puffs and simmer for another 5 minutes.

4. Arrange condiments and noodles in a serving bowl and ladle over hot gravy and sprinkle with laksa leaves as desired.

Labels: , ,

Thursday, December 28, 2006

Final cooking in 2006

I spent a good part of the last few days of 2006 in the kitchen cooking for family, friends and for myself. I had another embarrassing failure of an over-salted salmon fishcake that some first-time guests were too polite to not finish, while I could only swallow one bite of my own, and thankfully the rest were better. I’m also as happy as a clam at the fact that most of my dishes that I cooked on the eve of 2007 turned out pretty damn good after spending a good part of the year perfecting a handful of dishes with numerous disasters edible along the way. Alongside these, I’ve also had beginners luck with these two dishes over the past week.

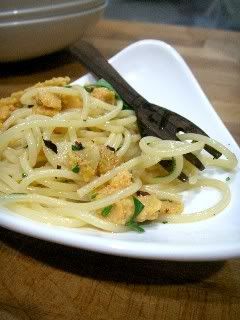
Spaghetti ai ricci di mare (Uni pasta)
Serves 4

Photobucket - Video and Image Hosting

1 tray of sea urchin roe
2 tablespoons + 4 tablespoons extra virgin olive oil
5 sprigs Italian parsley, chopped
2 - 3 cloves of garlic, chopped
1/4 tsp chilli flakes
salt to taste
400 g dried spaghetti

1. Bring a large pot of salted water to the boil and cook pasta according to the timing indicated on the package until al dente.
2. Meanwhile, gently mix sea urchin roe, 2 Tbsp extra virgin olive oil, parsley and salt to taste together in a large glass bowl.
3. Heat 3 Tbsp of extra virgin olive oil, garlic, chilli flakes and a pinch of salt until the garlic turns a darker yellow but not brown, about 5 minutes.
4. When pasta is ready, drain but save about 1 Tbsp of pasta water. Add pasta and reserved pasta water to the urchin roe mixture then pour over garlic and chilli oil. Toss well and serve.

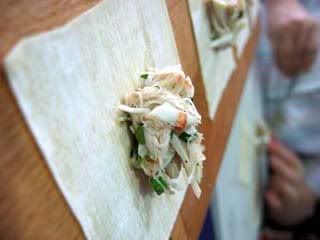
Crab Wontons in Lemongrass Broth
Serves 8 – 10 as an appetiser

Photobucket - Video and Image Hosting

Lemongrass broth:
2 litres chicken stock
3 stalks lemongrass, trimmed and chopped
Peels from a lemon
3 stalks of spring onion, cut into 5 cm lengths
1 tsp sugar
Salt and pepper to taste

To make stock:
1. Bring chicken stock to the simmer.
2. Add remaining ingredients and simmer, uncovered for 20-25 minutes, then strain. Check seasoning and set aside.

Crab wontons:
350 g crab meat
2 tsp olive oil
11/2 tablespoon finely chopped coriander
2 tablespoons finely chopped spring onions
½ teaspoon soy sauce
¼ teaspoon five-spice pepper
1 teaspoon grated lime zest
35 wanton skins + extras

To make wantons:
1. Combine all ingredients except wanton skins.
2. Place ½ a teaspoon of crab mixture in the middle of the wanton skin then dab the edges with water. Fold the wanton skin to make a triangle, then take the base edges and turn them about 45 degrees till they meet. Repeat till all the crab filling is used.

To assemble:
1. Reheat soup.
2. Bring another pot of water to the boil, then drop a few wantons in at a time. Remove as the float to the surface and transfer to serving bowls.
3. Ladle hot soup over wantons and garnish with sliced spring onions and serve immediately.

Labels: , , , , ,

Wednesday, December 27, 2006

I've learnt to to make a kick-ass roasted rump


If I were I cow, I want to be a wagyu cow. Life will be short-lived, but at least I would have had endless sake facials, massages, ate richly and well and drank copious amount of beer.

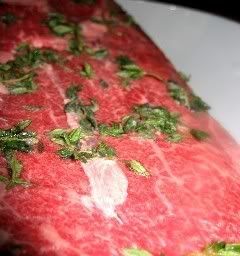
But lucky for me, I’m at the other end of the food chain. Over the past month, I’ve been trying to master the craft of making tasty cow’s buttocks, which is more politely known in society as roasted wagyu rump. I have tried a few permutations… one being seasoning with either thyme, olive oil, pepper and salt or rosemary, olive oil, pepper and salt. Between the two, I have found that because of the full tasting nature of wagyu, it needs a slightly more powerful herb and the so the rosemary stood up to it better.

The second thing I’ve tried to do it to roast it at a higher temperature in the oven and for 15 minutes and then lowering the temperature for the remaining cooking them, but I have found that it was easier and better to start the browning process in the roasting pan over the gas stove and to finish off the roasting in the oven.

The third thing that I have observed and would seem rather obvious is that it is very important for the piece of meat to come to room temperature before roasting, taking it out 15 minutes and 30-45 minutes before cooking makes a huge difference. If it is not at room temperature, the cooking WILL be uneven and the insides will be raw not rare, but raw and it still might be a tad cold.

Other observations I have made, making a roast starts with good meat. With a good marbling score between 8-10 wagyu meat, it will be very forgiving. If you over-roast it, it will be a damn shame but it will still taste wickedly good, but if you work with a calculator and a kitchen timer with a loud alarm and get it done medium-rare it will be a sure winner, and every meat-lover will want to be your friend.

Resting the meat is also a very important step that must not be skipped. I usually rest the meat rest the meat in the oven with its door open for 15 minutes before slicing. This is important because it is the process that allows the juices to return to the centre and makes it juicy and succulent.

When slicing, make sure you have a cloth at hand and that you are wearing an apron and not wearing white to make sure that any bloody meat juices spills do not make you look like a murderer.

Here is what I think should be done when roasting wagyu rump

For a 1.8kg rump
3-4 sprigs of rosemary, leaves picked and chopped
1-2 Tbsp olive oil

1. Season rump with salt and pepper then rub it with oil and rosemary. Do this at least 3 hours before hand or the night before and let it marinate in the refrigerator.
2. Remove rump from the refrigerator at least half an hour before cooking and ensure that it comes to room temperature.
3. Preheat oven to 180°C.
3. Heat roasting tin until hot and make sure you get a good sizzling sound when the meat hits the pan. Fry the meat on each side for about 3 minutes or until brown, then remove rump from pan.
4. Place a rack in the roasting tin and place rump, fat side up, onto the rack and transfer to the preheated oven and roast for 55 minutes. Switch off the oven and let meat cool with the oven door open.
5. Slice and serve with a green salad and mashed potatoes.

Labels: ,

Eating Christmas Leftovers: Peanut Butter & Turkey

After three days of festive eating and just over-eating, I’m left with a lot of turkey + stuffing, half a ham and about half a kilo of roast. So, seeing how I was totally abandoned by everyone in my family for dinner, I had a choice or either braving the rain to find some food or staying home and to cook. I decided on the latter seeing how it made no sense going out for dinner because it would do the dead birds injustice after roasting them in the hot oven for several hours and we really should try not to waste good food.

I was craving for some crunchy peanut butter, and was tempted to just slap some on one slice of bread and nutella on another and press them together for dinner, but again I felt really guilty about all the leftovers in the fridge that might be tossed out in a few days if I don’t help with the eating. Hmmm…. peanut butter or peanut butter or peanut butter, I simply could not shake the thought of peanut butter off my mind, and then I got it...it made perfect sense, I would make a ‘trashy’ peanut butter & turkey sandwich. To me it seemed relatively logical…err…after all, they serve a lot of Chinese chicken stir-fries with nuts right?

My house-help watched me with an aghast expression plastered on her face, as I proceeded to spread a thick layer of peanut butter on toast, laid shredded turkey meat, topped that with baby spinach, twisted the pepper mill and finished with another slice of toast. So to defend my sandwich concoction I made her a sample, a piece of turkey and spread some peanut butter that was received with a very surprised “it is good!” And I felt a sense of validation. Peanut butter & turkey sandwich, when I first said it out loud it sounded really odd, and perhaps it is just another one of those days where I have cooked/made nonsense food in my kitchen but the long and short of it is that I confess: I really liked it.

Labels: , ,

Saturday, November 11, 2006

When you fail, try again

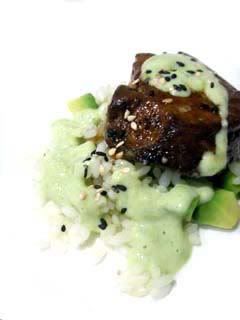
After my spectacular failure with foie gras, I was never sure if I dared to attempt it again. But I recently attempted to overcome my fear of cooking the huge lob of fatty liver, bit by bit: slices rather than a whole liver and a simpler recipe. I also recently spent some time talking to a chef who spent a long time mastering the art of cooking foie gras, who explained to me, the some important basics: it needs to be sliced not too thin or thick, and use butter and oil to raise the temperature. Also, after working through numerous recipes with him, I more or less concluded that one minute on each side would give me my golden brown crust and my creamy soft centre. I cooked with one eye on the liver and the other fixed on the second hand on my watch, scrambled to flip it after a minute and I succeeded! I’ve bounced back from my spectacular failure, I can now cook foie gras! For that evening’s experiment, I used Tetsuya’s recipe of pan-fried duck foie gras with rice, honey and soy.

Photobucket - Video and Image Hosting

Pan-fried Duck Foie Gras with Rice, Honey and Soy
This makes 4 servings

4 pieces of 30 g slices of duck foie gras
1 tablespoon of olive oil
1 tablespoon of butter
8 tablespoons of steamed short-grain rice
1/4 avocado, finely diced

Avocado Puree
1/2 avocado, peeled and sectioned
100 ml milk
salt and cracked black pepper
1 teaspoon finely chopped chives

Sauce
1/2 tablespoon honey
50 ml soy sauce
1 teaspoon lemon juice
To make the sauce, bring the ingredients to a boil.

Garnish
Toasted sesame seeds

Directions:
1. Prepare avocado puree. Blend together the avocado and the milk. Add salt and black pepper to taste, and then add in the chives.
2. To make sauce, bring all the ingredients to the boil.
3. Mix the rice with the diced avocado.
4. Heat butter and oil in the pan until nearly smoking, sear foie gras slices on both sides.
5. To serve, place about 2 tablespoons of the rice and avocado mixture in the base of each serving plate. Spoon on a little avocado puree and add the foie gras. Spoon over some sauce, then garnish with sesame seeds and chives.

Recipe taken from: Tetsuya by Tetsuya Wakuda, Ten Speed Press

Labels: , ,

Sunday, May 21, 2006

Cooking with Maple Syrup

After hinata’s zucchini flower and fig theme dinner a few months back, I took on the responsibility of hosting the next cooking project. I spent a few nights lying in bed trying to think of what to whip up for the guest that I had invited, I was a little intimidated. The problem with having foodies over is that you cannot serve them bad food and they are discerning eaters. I thought about going with dishes that I have more or less perfected through numerous taste-and-tweak sessions, but I felt like experimenting, so I still had to answer the pertinent question, what to cook? I pottered about the kitchen looking for some inspiration and I found the sweet gifts of maple syrup #2 amber and maple syrup mustard (and delicate and delicious homemade macaroons) that Clement of a la cuisine gave me when we met up in Toronto, alas, I had my answer, I’ll have a maple syrup-themed lunch!

I haven’t got too much experience in cooking with maple syrup; all I knew was that it was the golden liquid that I enjoy with my waffles and pancakes. So I decided to consult the source, Clement, who pointed me to 2 good recipes and conducted some research of my own. My research was twofold; the first was physical test: I opened the bottle and was greeted by a rich waft smell of caramel then I dipped my pinky finger into the bottle and tasted a strong maple taste. The second thing I did was to gather as much as information as I could, I found out that in Ontario, maple syrup into two broad categories, #1 and #2, the former being lighter in colour and sub-divided into ultra-light, light and medium, this is the maple syrup that we drizzle or drown out waffles and pancakes with and the latter is darker in colour and stronger flavoured, which is also the cooking maple syrup.


I was feeling slightly more educated and so I was ready to cook. The original menu cooked sounded like this: Sweet Potato Soup with Nutmeg and Maple Syrup, Maple Syrup Glazed Salmon with Mustard Mashed Potatoes and Maple Syrup Tart. That was the original plan, but it all went pear-shape when I was preparing my maple syrup glaze that I realised that I only had about two tablespoons of maple syrup left, just enough for the soup, but definitely not enough for a whole tart. Plan B that was hashed that night was to go with something simple and equally delicious, a comforting sticky date pudding with caramel sauce.


Photobucket - Video and Image Hosting

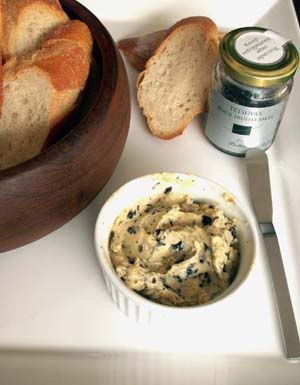
Lunch was filling and drowsy (too much sugar!). To start off, I served hot toasty bread with truffle butter, just for good measure, so that if everything else went wrong, at least the guest could say, we had some damn good butter. The truffles for the truffle butter was a food gift from N, a good foodie friend of mine, who came back from Sydney a while ago beaming and gushing about her meal at Tetsuya (we are jealous) and brought a bottle truffles (for butter) by Tetsuya, the recipe for the decadent and utterly sinful butter and a warning that the butter is addictively yummy that her sister got rather full on it even before their dinner even started. Well, it was some damn fine truffle butter and rightfully so: butter (fat = smooth texture + flavour) + truffles (flavour) = smooth super flavour.

Photobucket - Video and Image Hosting

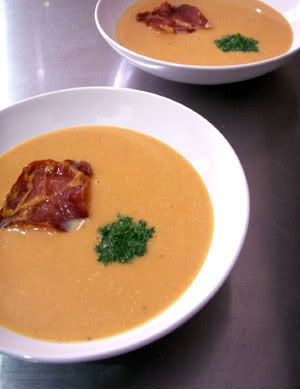
Not to be outdone by truffles, the maple syrup courses were rather good too. The maple syrup in the soup gave it a roundness and deeper sweetness, but with the addition of cinnamon and nutmeg, it tasted more like a Christmas soup rather than a soup. Good soup but maybe wrong season. The pride of lunch, however, was the plump slab of Norwegian salmon in the oven. I’m proud to announce that I (thankfully) didn’t overcook it and the maple syrup glaze cum sauce that was like nectar punctuated with candied pieces of ginger that mellowed during the reduction process. Credit to Clement for pointing me to the recipe, Thanks!

Cedar Planked Salmon with Maple Glaze
Serves 6

Ingredients:
1 cup pure maple syrup
2 tablespoons finely grated peeled fresh gingerroot
4 tablespoons fresh lemon juice
3 tablespoons soy sauce
1 1/2 teaspoons minced garlican untreated cedar plank (about 17 by 10 1/2 inches; if desired)
2 1/2-pound center-cut salmon fillet with skin
greens from 1 bunch scallions

Directions:

1. In a small heavy saucepan simmer maple syrup, gingerroot, 3 tablespoons lemon juice, soy sauce, garlic, and salt and pepper to taste until reduced to about 1 cup, about 30 minutes, and let cool. (Maple glaze may be made 2 days ahead and chilled, covered. Bring maple glaze to room temperature before proceeding.)

2. Preheat oven to 175° C (350° F). If using cedar plank, lightly oil and heat in middle of oven 15 minutes; or lightly oil a shallow baking pan large enough to hold salmon.

3. Arrange scallion greens in one layer on plank or in baking pan to form a bed for fish.

4. In another small saucepan heat half of glaze over low heat until heated through to use as a sauce. Stir in remaining tablespoon lemon juice. Remove pan from heat and keep sauce warm, covered.

5. Put salmon, skin side down, on scallion greens and brush with remaining glaze. Season salmon with salt and pepper and roast in middle of oven until just cooked through, about 20 minutes if using baking pan or about 35 if using plank.

6. Cut salmon crosswise into 6 pieces. On each of 6 plates arrange salmon and scallion greens on a bed of mashed potatoes. Drizzle salmon with warm sauce.

* I substituted paperbark for cedar plank.

Recipe source: http://www.epicurious.com/recipes/recipe_views/views/14473

Labels: , , ,

Friday, April 28, 2006

Don’t forget to salt!

Simplify simplify simplify. Let’s make cooking really simple. This week during one of my food geek conversations with a fellow foodie, we compared out latest cook book acquisitions, discussed about how we often bought faster than we could read and basically hoarded more books rather than cooking from them. I will admit, I’m a “book hoarder”, I buy and hoard for all sorts of reasons from the frivolous such as the pictures are so pretty to the more practical ones such as those recipes are easy to follow and to cook from. Books with gorgeous photographes and food that make me want to lick the pictures of the pages are usually flipped through, drooled over, thought about and then placed back on the shelf. The main reason being, if I really wanted to successfully execute the recipe, I might have to either build myself a commercial kitchen and hire and army of kitchen help or spend a few good days sourcing for the perfect ingredients. I sometimes like painless cooking (ie. no real slaving behind the stove necessary) with perfect results. I’m pleased to share that I’ve found one fantastic fun way of cooking. All you need are 3 different items and an oven!

Fresh fish
Egg whites
Salt

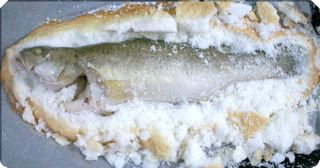
I had the privilege of working with a super yummy and fresh Murray cod so that made my job even easier. The Murray cod is a freshwater fish that is found in the Marry-Darling Basin in Australia. This fish is farmed and wild forms are available but are harder to come by with over fishing. Nonetheless, sometimes it is hard to screw up when you start with good fresh ingredients. Don’t try anything stupid like putting a super complex sauce on it that make take 5 hours to make from start to finish (stock included) that would steal the attention of the ingredient’s natural flavours. Just try to bring the ingredient to life and don’t waste it, after all, it did give up its life for the purpose of being food.

Here’s the shamelessly simple recipe:

Salt Baked Murray Cod
Serves 4


Ingredients:
1 Murray Cod
8 Egg whites
2 kg Salt

Directions:

1. Preheat oven to 200°C (400°F). Line a baking tray with parchment paper.
2. Using a large mixing bowl, mix egg whites and salt together until well combined.
3. Spread about one-third of the salt mixture onto the baking tray, spreading out evenly to form a 1-cm (½-in) base.
4. Place fish on salt base and cover the cod completely with remaining salt mixture. Firmly pat in salt mixture into fish.
5. Bake in the centre of the oven for 40 minutes. Remove to rest for 15 minutes.
6. Crack open salt crust and clean off as much salt as possible. Transfer to a serving plate.

* This recipe is an adaptation from the Salmon baked in Salt recipe from Paul Bertolli, Cooking with Hand.


Instead of Bertolli’s recommended Prosecco sauce, I served the fish with a crispy potato gratin stacks. The two worked well together as the high butter content from the gratin was “self-saucing”.

Labels: , , ,

Tuesday, February 28, 2006

When Ken met Kylie

Two popular TV chefs met in my kitchen last weekend. I was flipping through my cook books looking for inspiration and brainstorming for an appetiser/pre-dinner nibble for a friend’s dinner party last weekend when I came across Ken Hom’s Braised Fusion Mushroom with Herbs recipe. Having recalled that this dish is rather simple to put together and was well received, if I could use apply this recipe in a different manner. Thankful for cable TV and my borderline TV junkie behaviour, I decided to use Kylie Kwong’s mushroom tart hors d’oeuvre idea that I watched on TV a week or so ago. Ken and Kylie, two common household TV chef names, were then married in my kitchen to produce my Asian mushroom tarts.

Asian Mushroom Tarts
Serves 8


Ingredients
500 g shiitake
100 g oyster mushrooms
200 g enoki mushrooms
200g button mushrooms
3 Tbsp extra virgin olive oil
4 Tbsp coarsely chopped garlic
2 tsp salt
1 tsp five spice powder
4 Tbsp shao hsing wine
4 tsp light soy saue
2 tsp sugar
50ml double cream
3 chopped spring onions
Tart pastry cups

Method
Slice the button mushrooms.

Heat oil in a wok. Add garlic and stir-fry for 15 seconds. Then add the salt and pepper and all the mushrooms with the mushroom liquid and stir-fry them for 2 minutes.

Add Shao Hsing, soy sauce and sugar and continue stir-frying for 5 minutes or until the mushroom liquid has been reabsorbed by the mushrooms or evaporated.

Give the mushrooms a few stirs, transfer to a plate.

Fill pastry cups with mushroom mixture, sprinkle with spring onions and serve at once.

Labels: ,

Thursday, February 16, 2006

My Funny Valentine


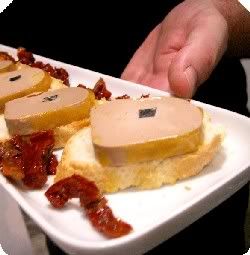
While other girls might be rather happy to receive a dozen roses and an ultra romantic expensive restaurant meal, I was pretty happy to be an invitee of a dinner where I received all I ever desired for a valentine’s dinner – sexy looking zucchini flowers, spicy chilli chocolate cakes and orgasmic foie gras terrine with truffles.

Image hosting by Photobucket

I guess in that sense I’m almost like every girl, I would like some flowers and chocolates for valentines.

Image hosting by Photobucket

xoxo.

Labels: ,

Monday, February 06, 2006

Easy Japanese

This is fast becoming one of our favourite dinner meals. Being awfully simple to put together without breaking a sweat, it is a great recipe to file away for weekday dinners. What more, with the rice cooker, most of the hard work is done without you lifting a finger, the only real work you need to do is to measure out everything in the right quantities, or you could even “eyeball” it, dump it into the rice cooker, press the cook button and volia the meal is ready.

Steamed Salmon Rice with Mushrooms
Serves 4


Ingredients
6 dried shiitake mushrooms
500 ml hot water
2 cups uncooked Japanese rice
2 Tbsp soy sauce
3 Tbsp sake
3 tsp rice vinegar
½ tsp salt
200 g skinless salmon fillets
4 tsp mirin
Nori, to garnish
Toasted sesame seeds, to garnish

Method

1. Soak shiitake mushrooms in hot water for 10 minutes, drain and gently squeeze to remove excess liquid. Remove shiitake stalks and slice thinly. Reserve soaking liquid.
2. Combine reserved mushroom liquid, Japanese rice, soy sauce, sake, rice vinegar and salt and add all the ingredients to a rice cooker.
3. Place, salmon and sliced shiitake on top of rice and let the rice cooker work its magic.
4. Once rice is cooked, use a fork to flake salmon and stir in mirin.
5. Scoop rice into serving bowls and garnish with nori and sesame seeds.

* Recipe source: Quick and Easy Japanese Recipes (Periplus Mini Cookbooks)

Labels: , , ,

Tuesday, January 31, 2006

My New Sushi Box

My dad once turned to me in a shopping centre and told me, the difference between men and women when it comes to shopping is that men are hunters; they know what they want when they enter the store and they hunt the item down. Women on the other hand are gatherers, they will walk around the store, look around for things they need and do not need and gather them together. This time my dad was right. While out looking for a larger pestle and mortar to replace the one I have at home, I ended up coming home without the pestle and mortar but an oshibako (wooden mould used to make pressed sushi). When I reflect about it, a sushi box is pretty different and far off from the original item I was looking for but nonetheless I’m rather satisfied with my new kitchen member.

To put my new kitchen baby to the test, I made some oshizushi (pressed sushi) over the past 2 days for lunch, dinner and lunch again. By the third attempt in 24 hours, I think I can safely say I’ve mastered the simple art of oshizushi. The whole process is rather gratifying. It all begins with first lining the box with some sushi rice followed a layer of topping and then pressing it all down with the lid. The final and my favourite step is the act of pulling off the mould to reveal the beautiful compact rectangle of edible art. All that is left is to cut the rice block up into bite sized portions and to top with some nori. Oh the joys of oshizushi!

Spicy Maguro Oshizushi


Ingredients:

500 g cooked sushi rice
500 g sashimi grade maguro, cut into 0.5cm cubes

Spicy dressing
¾ cup Japanese mayonnaise
3 Tbsp sambal
Juice from ½ lemon
2 Tbsp dried bonito flakes
1 Tbsp tobikko
Salt to taste
Nori for garnish

Method:
1. Combine all the ingredients for spicy dressing.
2. Gently fold in tuna into spicy dressing and coat well.
3. Line oshibako with a layer of sushi rice and followed by a layer of spicy tuna mixture. Press the lid down. Continue to press the lid down and slowly lift the box away. Remove lid and slice into desired sizes. Garnish with nori and serve.

* Recipe adapted from Florence Tyler’s Real Kitchen

Labels: , , ,

Monday, January 23, 2006

Cooking Whilst Sleeping

Braising is a cooking technique, which I embrace. Whilst I find the process of chopping the mire poix and other flavouring vegetables extremely therapeutic, the most gracious element of this cooking technique is the relative effortlessness. The fact that most of the cooking does not need too much attention but patience allows me time to shower and to nap from the start to the finish of the dish.

I elected to Short Ribs Braised with Chinese Flavours from Simple to Spectacular by Jean-Georges Vongerichten & Mark Bittman for a mid-week dinner on the rationale that I could cook it the day before bedtime, crawl into bed, snuggle up and forget about it. I followed my plan, but my mind refused to shut down. My internal clock woke me up at intervals of 45 minutes (the recipes suggested that the meat should be turned once or twice an hour) and since I was up, I would pad my way down to the oven, take a peek and turn the meat. My plan to cook whilst sleeping hence was a total failure. My only comfort is that the braised short ribs did fall off the bone and smelt phenomenal.

Short Ribs Braised with Chinese Flavours
Serves 4


Ingredients:
Peanut oil, ¼ cup
Short ribs, 4 lb
Salt and freshly ground black pepper
Onion, 1, peeled and roughly chopped
Garlic, 4 cloves, peeled and smashed
Ginger, ¼ cup, roughly chopped
Sugar, 2 Tbsp
Star anise, 5
Dried chillies, 5
Szechuan peppercorns, 2 Tbsp
Coriander stems, 20, well washed
Shao Hsing, 1 cup
Light soy sauce, ½ cup
Water, 3 cups
Water chestnuts, 12, peeled, washed and quarted
Minced ginger, 2 Tbsp

Method:

1. Place 2 Tbsp of the oil in a deep heavy skillet or casserole and turn heat to high. Brown rigs well on all side, seasoning well with salt and pepper as they cook; this process will take about 20 minutes. Remove ribs, pour out and discard fat and wipe pan.

2. Preheat over to 175°C (350°F). Place remaining oil in pan, turning heat to medium-high, add onions, garlic, ginger and sugar. Cook, stirring until the onion is very brown, 10-15 minutes.
Add star anise, chillies, peppercorns and coriander roots; cook, stirring for another minute, then add Shao Hsing, soy sauce and water. Add ribs, cover and put in oven. Cook until meat is very tender and falling from the bone, about 3 minutes, turning the meat once or twice an hour.

3. Transfer the ribs to platter. Strain the vegetables and liquid, pressing hard on the vegetables to extract all of their juices, into another large pan and refrigerate or reheat. Bring to a boil and whisk until slightly reduced then add the ribs, water chestnuts and minced ginger. Heat the ribs through, and adjust seasoning as necessary.

4. Serve with steamy hot rice.

* Recipe Source: Simple to Spectacular by Jean-Georges Vongerichten & Mark Bittman (with slight edits)

Labels: , , ,

Sunday, January 22, 2006

Foie Gras & I

Cooking with foie gras intimidates me. My first experience at home was a total disaster. Unfortunately I do not have the photos to show for it, (I deleted it out of disgust and the sheer embarrassment of the ugliness of the disaster) but take my word for it, it was horrible. I identified Thomas Keller’s roasting a whole foie gras for the experiment of the day. I had successfully de-veined and pieced back the liver, but my eagerness and impatience did not allow it to sit long enough in the fridge to re-set back into place and that was where it all went downhill. The book called for me to pan sear it and to toss it into the oven for the roasting. The picture in the book looked so beautiful, and the procedure seemed so simple, but alas it was not so for me. The minute my foie gras hit the pan, it started to fall apart and all I could see was this expensive delicate food item melt and fall away into the pieces that I had formerly broken it up into. The end product was overcooked on some ends and only edible on some parts.

M and A invited me over for dinner on Wednesday because they had some overseas visitors for dinner. I asked what was on the menu and A informed me that M was going to be cooking foie gras. My instant reaction was, “Has M ever done it? The last time I tried making foie gras it was a total disaster! The whole thing disintegrated on me and I watched my dollars literally melt away in my pan! Wish M all the luck in the world for tonight!” The conversation jolted my past experience, which I had longed to file away in my memory. Thankfully M was much better and successful with his first attempt. It almost made me jealous that his foie gras looked beautiful and had a lovely pan-seared crisp crust, a much much much better attempt than mine. I’m still intimidated.


The dinner that was cooked up was simple and luxurious. We started off with a Thai-flavoured prawns, which A has decided to call (she names all the plates) Otah-styled prawns. Put simple, there were spice elements that led to us commenting that it reminded us of Otah, and hence Otah-styled prawns. Following suit was the indulgent of roasted tenderloin with foie gras served with pineapple chutney. The pineapple chutney brought a good sweet balance to the plate alongside the slightly bitter salad leaves that were served. Dessert, was suppose to be simple, but it turned out to be a multi-coursed meal in itself! We started with a fruit platter, and then came the box of oh-so-delicious box of Royce chocolates. Before even the second piece of chocolate melted away in my mouth, I was served with a scoop of pineapple tart ice cream from island creamery. The ice cream was fantastic, but I felt so guilty from all that food that I resisted a second portion. Still dizzy from counting all my calories, the cheese plate arrived and my wine was refilled, at that point, I had decided to stop counting calories, taste everything once, and wash it all down with some Chinese tea. Dessert did finally come to an end and I rolled out of the house and made my way home and slept happy. I later dreamt about cooking foie gras; It must have been the encouragement by M’s success, so, perhaps, perhaps, perhaps.

Labels: , ,

Thursday, January 05, 2006

Cooking with Mentaiko!

The culinary year for me started off on a rather exciting note! Hinata from Aventures d'une cocoette and I got together over the New Year holidays to work together on some mentaiko ideas that we have been bouncing off one another. Here's our joint account of adventure!

Hinata says:

Joone and I had recently been exchanging e-mails on how to use mentaiko, aka spicy cod roe. Before we knew it, we had whipped ourselves into a bit of a mentaiko frenzy and a plan was set to spend Monday afternoon preparing (1) our take on the now classic mentaiko pasta and (2) mentaiko panna cotta. The former is a dish that has been blogged about by others (Chubby Hubby, J, Umami and Obachan) on several occasions, and so seemed a must-try; the latter was inspired by Joone’s Christmas post about waylaid plans to make panna cotta then. Mentaiko panna cotta also seemed fanciful enough to be a true test ofculinary sensibility – one false step and it would almost certainly taste horrendous but, oh, the glory to be won if it turned out good! And so the intrepid explorers set out on the grand mentaiko quest…

Mentaiko pasta
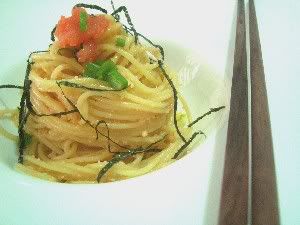
Image hosted by Photobucket.com

To be honest, I have very little idea of what was going on in the preparation of the mentaiko pasta, having been engaged in a battle with cream and gelatin at the time. So please see Joone’s wonderful instructions for details. What I can tell you though, is that it tasted pretty damn good. The cream held together a combination of contrasting flavours - the mentaiko was a delicate mixture of the salty and bitter, while the vinegar imparted a light “appetite opening” tartness – resulting in a rare balance that leaves you wanting more after each bite. For the record, greedyboy* wolfed down his plate even before Joone and I could serve ourselves. Similarly, I thought I could only manage one plateful, but ended up gobbling two then staring at the empty serving bowl wistfully.


Mentaiko panna cotta
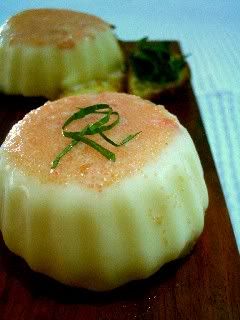
Image hosted by Photobucket.com

Given that we’d pulled the idea for mentaiko panna cotta out of thin air, this dish was incredibly fun to prepare. Without strict guidelines and preconceived notions to adhere to, we attacked the dish with the enthusiasm of 4 year olds inventing food with Playdoh. Fortunately, the end result was substantially more edible – the panna cotta was sweet and creamy (duh), and together with the lingering taste of mint, tasted sophisticated against the crunch and heartiness of the toast. Very addictive! The mentaiko provided great colour and visual appeal, but had minimal impact on both taste and texture, possibly as a result of first being overwhelmed by the sweetness of the panna cotta and then having gotten a little cooked by the heat of the warm cream. As a result, although we had imagined the dish more of a savoury appetizer or a cheese-like pre-dessert, the final product was decidedly a dessert, and one for the highly sugar inclined at that. We were then left with a bag of questions as to how to prepare it differently the next time – use less sugar? Top the panna cotta with mentaiko only at the end? Up the mentaiko: cream ratio? Substitute mint with fresh herbs? Conclusion: for such an odd couple, mentaiko and panna cotta offers a world of flexibility and variation. We’ll definitely keep experimenting with this in the future!

Joone says:

The thing I like about cooking rather than baking is the relative freestyle you are given in inventing your own dishes. I am clumsy and suffer from myopia, so staring closely at a weighing scale to ensure that I get the measurement of sugar and flour correct is sometimes quite a chore, simultaneously having to ensure that I don’t carelessly tip too much flour in causing my airy cake to transform into a dense brownie or biscuit, it sometimes borders on frustrating. Cooking on the other hand gives me more space and margin for error. In this case of our mentaiko pasta, the recipe happened out of necessity. I had people to feed and had neglected to buy a major ingredient from the supermarket and so I had to abandon the original recipe that we identified. Thankfully this experiment tasted pretty damn good, hungry people are not exactly the friendliest.

Mentaiko Pasta
Serves 3

Mentaiko, 1 fat sac, set some aside for garnish
Spaghetti, 200 g
Japanese mayonnaise, 1/4 cup
Rice vinegar, 1 Tbsp
Sesame seeds, 1 Tbsp, roasted and ground
Light soy sauce, 1 tsp
Mirin, 1 tsp
Nori, thinly sliced
Spring onions, 1 stalk, thinly sliced

Directions:

Slit open the mentaiko sac. Using a spoon, gently scrap out all the roe and discard the sac.

Bring a large pot of salted water to a boil, cook pasta as directed to al dente.

Meanwhile, in a bowl, using a whisk, combine Japanese mayonnaise, rice vinegar, ground sesame, soy sauce and mirin. Use a wooden spoon or a rubber spatula and gentle stir in the mentaiko.

Drain pasta and toss with the prepared sauce. Transfer to a serving dish, garnish with nori, spring onions and top off with mentaiko. Eat immediately. (Sometimes there is nothing better than instant gratification.)

Mentaiko Panna Cotta
Makes 8

Heavy cream, 3 cups
Sugar, 3/8 cup
Salt, a pinch
Mentaiko, 2 large sacs
Powdered gelatin, 2 tbsp
Hot water, 6 tbsp
Mint, 4 leaves, thinly sliced
Toast, 4 slices

Directions:

Slit open the mentaiko sac. Using a spoon, gently scrap out all the roe and discard the sac. Separate roe clumps gently with fingers, as far as possible without damaging roe.

Heat cream, sugar and salt over medium heat, stirring constantly until smooth. Remove from heat once first bubbles appear. Transfer to mixing bowl.

Add mentaiko to cream sugar mixture and leave to infuse for 10 minutes.

Mix gelatin in hot water, stirring constantly. Add to panna cotta mixture.

Place panna cotta mixture in bowl of iced water to chill for further 10 minutes. Once mixture has cooled down and thickened slightly, transfer into individual ramekins, ensuring that each ramekin has equal portions of mentaiko (mentaiko may have settled at bottom of mixing bowl). Chill in refrigerator until firm, approximately 2 hours.

To remove panna cotta from ramekin, immerse ramekin in warm water for 10 seconds. Invert gently onto half slice of toast cut to desired shape. Garnish with chopped mint and additional mentaiko to taste. Eat with spoon or 'toast fingers'.

Labels: , , ,

Tuesday, December 27, 2005

Christmas Cooking


Roasted Butternut Squash Soup with Chestnut

Christmas cooking duties were split between families this year. My aunt took charge of massaging the turkey and ensuring a tender and succulent turkey and glazing our hunk-a-chunk of a ham and I took charge of the beginnings and the end of the dinner. I was in favour of a panna cotta but my brother insisted and made his case for a chocolate fondant, after all, who would resist a chocolate fondant? So dessert was set in its mould.

On to starters, I love appetisers; they are probably my favourite section of the menu. Given a choice, I would rather have two or three appetisers and forgo the main course. Given my inclination towards appetisers, I normally am never satisfied just planning for an appetiser and would more often than not serve two or three, and if I’m feeling like a super-cook, maybe consider more. This year’s Christmas dinner was no different, the final count was four. After flipping and tagging recipes in book after book after book, it finally came down to a di mare theme and a soup. To start off the seafood medley, we had fresh oysters with vinaigrette and topped off with tobikko. For a touch of drama, we filled this large 2 metre long serving vessel with ice and sea salt and poised those plump sexy oysters on. Following, I served a sashimi platter of sake (salmon) and maguro (tuna) lightly marinated with an orange infused soy based sauce, and poached prawns in a dashi stock with avocado and roasted red peppers salsa. To round off the appetiser section of the dinner and to remind everyone it was Christmas, I made a velvet smooth roasted butternut squash soup with chestnut. (I associate chestnuts with Christmas because of the line from the Christmas song, “Chestnuts roasting on an open fire …”).

Image hosted by Photobucket.com

On Christmas day itself, we attended a red and green themed Christmas party. Already stuffed with turkey and ham from the night before, we decided to bring red and green themed food instead for a little Christmas fun. Still fascinated by how exquisite and simple the food at Xi Yan was, we decided to attempt at re-creating another dish from the new private dining restaurant, the signature Japanese tomatoes in sesame sauce. Shopping for this dish was a fascinating process. We headed to meidi-ya to hunt down those gargantuan Japanese tomatoes that Xi Yan uses, Japanese tomatoes rather easy to locate, but those XXL ones were not such an easy task, and so we settled for those that were available and served it with the nutty, creamy sesame sauce.

I’m exhausted from the cooking but thoroughly satisfied with my Christmas creations this year. The Christmas soup this year was thankfully miles better than a curry zucchini soup tasted odd from the possibly bitter burnt curry powder, here’s the recipe for the good soup –

Roasted Butternut Squash Soup with Chestnut
Serves 4-6

2 tbsp extra-virgin olive oil
1 tsp minced garlic
1 kg butternut squash, peeled, seeded and cut into 1 inch chunks
1 birds eye chilli, seeds removed and minced
3 springs thyme, stalks removed
Salt and pepper to taste
4 cups chicken stock
3 tbsp freshly grated Parmesan
10 chestnuts, boiled and shells removed

Directions:

Preheat oven to 225°C.

Heat olive oil in ovenproof pan over high heat, sauté garlic, with squash and add chilli, thyme, salt and pepper. Cook till squash browns slightly, about 10 minutes.

Transfer pan to oven and cook for another 15 minutes, shaking the pan midway to ensure even roasting.

Return pan to stove and over medium heat, add stock. Cook for another 15 minutes or until squash it tender, remove from heat and puree in a blender. Add water if soup is too thick to ensure a smooth consistency. Ladle into individual soup bowls and garnish with parmesan and a chestnut; or soup can be set aside, reheated and garnish when serving.

Labels: ,

Friday, December 23, 2005

Look Mom, No cooking!

Although I find the act of cooking and following recipes rather therapeutic, cooking on the weekdays sometimes really stresses me out. If I had to cook for myself, I would be quite content slapping some cheese and ham into a sandwich maker or a grill for a toastie; but having to attend a mid-week Wednesday surprise pot luck birthday party is another story altogether. I needed something really simple and easy to piece together with minimal equipment since I would have to cook in a foreign kitchen. The solution, don’t cook. Instead, I tried to replicate Xi Yan’s Cold Tofu Pork Floss dish, no cooking involved (just boiling of eggs, and that can be done beforehand), just buying ingredients and combining them in a presentable fashion. Here’s my impressionistic version of Xi Yan’s Cold Tofu Pork Floss.


Ingredients:

1 block silken tofu
1 spring onion, chopped
1 tbsp fried shallots
2 salted egg yolks, chopped
1 tsp sesame seeds, toasted
50g pork floss
50ml store bought tempura sauce

Directions:

1. Use kitchen towels to pat dry the excess liquid from tofu.
2. Place tofu in a shallow bowl and top with a both salted egg yolk and fried shallots and carefully place pork floss on top of the other two ingredients.
3. Garnish with sesame seeds and spring onions.
4. Carefully pour tempura sauce around tofu and serve.

* If you like more shallots, place more on the side of tofu.

Labels: , ,

Thursday, November 03, 2005

The Rooting for This Potato

With my current affection for sweet potatoes, I do not think I would have a problem adapting to the war time sweet potato diet that our grandparents lived on during the World War II. The sweet potato is probably an underdog vegetable. It is often overlooked even though its natural sweetness makes it palatable and enjoyable to eat, and it provides a good source of vitamin C, vitamin A and antioxidants. So I’m rooting for this root vegetable!

Roasted Sweet Potatoes with Miso, Orange and Sesame
Serves 4


6 small sweet potatoes
1 cup orange juice
1cup water
1-inch piece of fresh ginger, grated
1 tbsp light miso
1 tbsp soy sauce
1 garlic clove, halved
1 tbsp grown sugar
1 tbsp sesame seeds

Directions:

Preheat the oven to 225°C. Pierce the sweet potatoes with a fork and bake until tender, 30-40 minutes. While they are baking, make the sauce. in a saucepan over medium-low heat, combine the orange juice, water, ginger, miso, soy sauce, garlic and brown sugar. Cook until the sauce reduces and is thick enough to coat the back of a spoon, which will take about 15 minutes, set aside.

When the sweet potatoes are cool enough to touch, slice them in half lengthwise and lay them face down on a sheet pan. Spoon the sauce over the flesh of the potatoes, sprinkle with the sesame seeds, and broil until the sesame seeds are toasted.

* Recipe Source: Tyler Florence, Real Kitchen

Labels: , ,

Saturday, October 22, 2005

Pork and Burnt Crackling

My original intentions were pork and crackling, but I was too engrossed in some television programme that I lost track of time. By the time I realized and sprinted to the kitchen, the oven was already giving off slightly unpleasant fumes. The good news, it was still edible, the bad news, the crackling was burnt. I scrapped off the very charred bits and brought it as my pot luck dish anyway. Thankfully, the meat was still moist and no one seemed to have minded the burnt bits.

Pork and Crackling
Serves 8


Ingredients:
½ pork loin, bone removed, scored
salt
1 tbsp chopped fresh rosemary
½ tbsp fennel seeds
5 cloves garlic
½ cup balsamic vinegar
4 bay leaves
2 tbsp olive oil

Directions:

Lay out your pork on a board and rub some salt and chopped rosemary into the scored lines, trying to get this into every bit by pushing and rubbing in. Rub the skin of the pork with lots of sea salt as it will help to dry out the skin for good crackling.

In a mortar and pestle, smash up the fennel seeds, the garlic, then the remaining rosemary, and rub this into the meat – not the skin, or it will burn.

In a bowl, marinate the pork with balsamic vinegar, bay and olive oil and leave for about ½ hour.

Preheat the oven to 230°c. Place the pork on the top rack of the oven. The pork will take about an hour the cook. After 20 minutes, turn down the oven to 200°c and keep roasting for about 40 minutes. Allow the meat to rest for at least 10 minutes, slice and serve.

Labels: , ,

Sunday, September 25, 2005

A Roast Chicken

Chicken is an everyman’s meat. As a matter of taste, chicken seems to be a neutral but tasty piece of meat that most people would eat. I recall a phone conversation with a friend who called to tell me about the new love in her life -- who is a vegetarian; despite being really delighted for her, I chimed that there was a high probability that I would never date a vegetarian since I simply love my food too much and I could not imagine not sharing a meal that never involved a dead carcass. The voice on the other side of the line echoed back, “Yes, to a certain extent I understand, I love chicken. I really do love my chicken. It might make my taste buds sound like those of a peasant, but I really love my chicken. I really do.” Bless that silly friend of mine, chicken is a wonderful bird that almost everyone enjoys, it does not make any of us better or worse than others.


Ingredients:
¼ cup sugar
½ cup plus 1 tsp salt
1 whole chicken
juice of 2-3 limes
2 tbsp fish sauce
1 large clove, minced
¼ cup finely chopped cilantro
1 tbsp red pepper flakes
½ cup canola oil

Directions:

(Start the day before)
Fill a large pot with 4 liters of water, ¼ cup of sugar and ½ cup of salt. Bring to a boil then reduce heat and simmer, uncovered, for 15 minutes. Let it cool completely.

Add the chicken to brine, cover, and refrigerate for 6 hours.

Heat oven to 250 degree Celsius

Remove the chicken from the brine and pat dry, roast for 45minutes or until the skin is crisp.

While roasting chicken prepare the vinaigrette for the chicken –

Whisk together the lime juice, fish sauce, garlic, red pepper flakes, cilantro and salt. Then add oil in a slow stream, whisking until combined.

Pour the vinaigrette over the chicken and serve. (It might be a better idea to serve the sauce on the side)

* Slightly Adapted from, Ruth Reichl (ed), “Foolproof Grilled Chicken”, in The Gourmet Cookbook: More than 1000 recipes, (New York: Condé Nast Publications, 2004), 363-364

Labels: , ,

Friday, October 29, 2004

Kitchen Experiments: Thai-Styled Portobello


Recipe:

I crushed the following in the pestle and mortar to make the dressing:

2 cloves of garlic
Chili
Salt
Pepper
Fish Sauce
Sesame Oil

Directions:
1. Dress the Portobellos and then finish off with drizzle some olive oil.
2. Let the dressing sit for about 15 minutes
3. Then pop it into the oven at about 200 degree Celsius for about 10 minutes
4. Serve with thinly slices mangoes or small diced mango cubes.

Result: It was pretty good. The sweetness of the mango offsets the saltiness of the rest of the ingredients, although I went a little garlic crazy so I used 4 cloves and so I think 2 would be better.

Labels: , ,